|
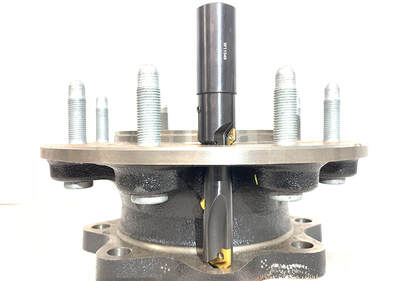
The Challenge The challenge was to achieve both hard and soft cost savings, as well as time spent on drilling flanges from one side, chamfering the backside and creating a controlled chamfer on the top surface which was a secondary process. The Solution
We designed an indexable drill with our rear cutting carbide deburring insert along with a fixed pocket chamfer insert to create the precision top chamfer that was required. The spade drill insert also had a special feature that allowed it to chamfer the top side of the bottom hole that was pre-drilled. The Results Four operations were completed in one pass. The EZ Burr Burr-Free Drill drilled the hole, deburred and chamfered the back all in one step, thus eliminating the secondary step of chamfering the bottom surface on the top hole. This saved time as well as money, plus the tool life of the Burr-Free Drill achieved a more consistent result and had a longer tool life than the previous method.
1 Comment
This article is about Blue Photon Technology and Workholding Systems LLC and how Post Processing; 3D printing presents challenges in workholding for finish machining. Written by Mark Kirby AM Business Manager, Renishaw Canada Metal 3D printing can enable rapid, low cost iterations of new medical devices, since no tooling costs are involved. All devices need testing to uncover problems and develop solutions—allowing the product shape to change “for free” is a powerful advantage with Additive Manufacturing (AM). Other benefits flowing from AM besides enabling more complex geometry are improved accuracy with no component tolerance stack up, and a simplified supply chain with reduced part count.
3D Printed WorkholdingPlastic printed jaws are often a good first option, as they are cheap to manufacture—typically in just a few hours on a desktop printer, and can conform to complex geometries (although the design of the jaws can be more time consuming than a simple Boolean subtraction of the component from the plastic). When the design changes after product testing it is easy to print a new set of jaws. The main disadvantage of plastic jaws is that they will often distort the component as they are tightened. Although the jaws hold the part rigidly for machining, when the component is released from the fixture any machined bores may no longer be perfectly round, and true positions of features will have moved slightly as the component relaxes back into its unloaded shape.
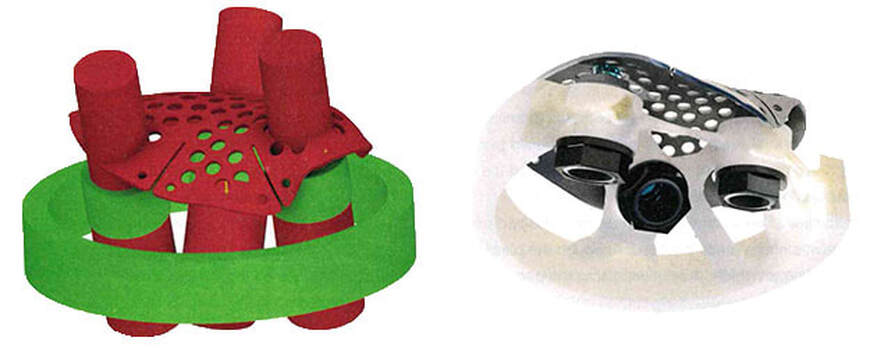
The tracker body was monolithically printed in titanium alloy Ti6-4, stress relieved and then cut from the build plate ready for finish machining of the kinematic mount and the four posts that hold the optical reflector globes. A plastic set of jaws was designed to clamp the part while leaving the machining areas exposed. Although the plastic jaws clamp the part rigidly, they never clamp the part repeatably, so the exact position of the part must be found using a machine probe and best fitting software such as NC-PerfectPart, from Metrology Software Products Ltd. (MSP). Originally developed for machining of high value aerospace and Formula 1 composite structures, this software is perfectly suited to the challenge of precisely locating an organic-shaped AM part with no obvious datum features. Points are selected on the component in the CAD environment and the deviations from nominal positions are measured by the probe on the CNC machine. The NC-PerfectPart software then creates a best fit alignment that is a 6-axis coordinate transformation—both translation and rotation. This coordinate shift is automatically recalled into the machine controller before CNC programs are executed.
Problems and SolutionsUnfortunately, the hip tracker component flexed imperceptibly when the plastic jaws were clamped, resulting in true position errors greater than 0.3mm on the machined posts. While the component had been optimized for handling loads during surgery, it had not been designed to resist machining forces. In order to machine the part accurately it was essential not to bend it with mechanical clamping, but at the same time it was equally important to add rigidity. The solution was to use Blue Photon’s UV activated adhesive and grippers. By gluing the part onto four gripper posts (that transmit UV light to cure the glue in approximately 90 seconds) the hip tracker was held firmly but still in the free state. An aluminum block was machined to hold the four gripper posts in the correct positions for the tracker body. Initial machining was successful on the three posts directly bonded to the grippers, but one post was cantilevered above the gripper and vibrated during machining. A plastic support block was printed to hold this post and eliminated this problem. By cradling the part, the support block also allowed for more accurate positioning of the tracker prior to the glue being cured. The glue thickness is optimally around 1mm, and after machining the part and fixture can be separated by simply immersing the assembly in near boiling water for a few minutes, and then peeling apart. The only disadvantage of using the glue grippers appeared to be the extra work to design and machine the gripper fixture. However, on a subsequent project for an industrial impeller Renishaw used plastic printing to produce the gripper fixture instead of machining. This proved that the manufacture of a robust, custom workholding solution can be reduced to an overnight desktop print. Refining the Procedure: |
ABOUT
This is where we publish technical articles, applications stories, tip and tricks, new product announcements and press releases. Archive
March 2024
Categories
All
|
|
F&L Technical Sales Inc.
326 Woodland Way Russell, MA 01071 Established 1999
|
© 2024 F&L Technical Sales Inc.
All Rights Reserved site design: Rapid Production Marketing
|


 RSS Feed
